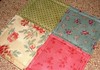
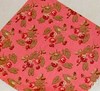
 Materials needed:
 1-Cut out fabric as instructed on pattern pieces
 2- layer Bottom Overlay and fusible interfacing; right side of fabric with smooth side of interfacing.(.or glue side up.) Stitch across the top at 1/4 inch. Clip curves and turn to right side.
 3- finger press, then iron, across the very top. Then iron the whold piece. Do this with both overlays.
  5-Line up the overlay with bottom of main piece. Topstitch at 1/8" and then again at 1/4"
  6- With main pieces, right sides together, sew side and bottom seams at 1/4"
 7-Line up side and bottom seam. Sew across at 1/4" to form corner..or flat bottom for purse.
 8- Fuse interfacing to one of the pocket pieces. With right sides together, sew 3 sides at 1/4" seam allowance. Clip the 2 corners and turn right side out.
 9- Press raw edges under 1/4". Edge stitch pocket closed.
10- Attach pocket to right side of one lining piece.
11-With right sides of lining pieces together, sew side seams, bottom seam, then corner seams.

12- Turn right side out, and press side seams of lining, and of main bag body.

13- Now it's time to make the handles. Take the handle pieces, fold in half and press. Open, then fold sides in to center fold line, and press.
14-fold in half and press again.

15- Top stitch handles at 1/8th and 1/4 inches. Press flat.

16-pin handles in the center of the handle spaces on main fabric. Set main body aside for a minute.
17- Attach magnetic snap to lining.

18-Put main purse into lining--right sides together. Match side seams and pin in place.
 19-Sew around the top at 1/4" leaving an opening, about 3", for turning right sides out.
21-Fold the spece you left open undre 1/4". Press and pin.
22-top stitch around the whole purse opening at about 1/4".

23-Press entire purse, especially the top edge.
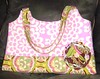
24-Embellish however you would like!! I used this flower!
25-Enjoy your new bag!


25 comments:
Cute bag! Thanks for sharing th tutorial.
Cute bag. I've made the Jenny for my sisters who love it. I think I'll make the Angel Bag for me. Thanks for sharing your fabulous bag tutorials!
Totally love the bag! Way better than the simple things I make. Can I link it on my Village shop blog?
What a great tutorial. Thank you for sharing. Its a darling bag.
what a sweet little bag, thanks for a great tut!
I am totally hoping you win!
LOVE THE BAG! I'm going to get to work on it right away. I"m a sucker for a cute bag. I only wish I could find the same fabric you used.
Oh my how cute!!! I am a total bag-a-holic and just can't wait to make one. Thanks for the great tutorial!!
What a great bag, and a wonderful tutorial!
Thank you for the tutorial!
I love it that you use an old sewing machine, too!
this is the cutest!! great pattern and tutorial....thank you!
Hello- I made a bag this weekend, based on your tutorial. I really like it. I am impressed with the ease and style of the bag. The pattern was easy for me to follow, although I am not yet too accomplished at sewing. My only complaint is that the handles seemed a bit wimpy for such a bag. I redid mine with fusible fleece inside the double fold bias. It makes the handles seem to go better with the bag. Thanks for the tutorial. I am going to try your Jenny bag too.
Thank you so much for this tutorial. I made this bag two times today and I`m in love with them.
Dankeschön!!!
Amy Butler fabrics! I bought the same one to make a bag as well.
Awesome tutorial btw!
Great tutorial. Thanks. I will have to make this purse.
thanks for stopping by my blog. Love your tutorials. I like to sew too so I will definitely be bookmarking this site and checking back again soon. Good luck in my drawing.
Thanks for the great pattern! I made a super-sized Angel today and love it. I'm already scheming to make another one :)
Thank you so much for this wonderful pattern and tutorial. I just made this as a gift for my daughter's teacher, and I love how it turned out.
Here's my blog with a picture of it:
http://mamiebelle.blogspot.com/2009/06/i-have-been-sewing.html
Very cute bag - love your fabric choices.
Thank you for this pattern! I made a Littlest Pet Shop purse for my daughter. She picked out this pattern, and her own fabric. Instead of using fusible fleece, I used jean material because the material I had was very hard to work with and stretchy. I fused the jean material with iron on adhesive. The only thing difficult was the very last part, sewing it up. It was difficult because of the material that I had. If I'd used different material, I think it would be pretty easy. Here's a link to my blog that has the picture of it. It turned out really cute!
http://creativemomprojects.blogspot.com/2010/01/ive-been-busy.html
I made this bag- thanks for the pattern! I'm posting a link to it in the next few days. Thanks!
Just found your great tutorial - thanks so much for sharing! I've just added your link to my Purses, Totes and Handbags Listings at http://www.linda-matthews.com/free-purse-patterns-and-tutorials/by-date/#sep2010
I want to make this bag for my Daughter in Law and the pattern won't come up. Has it been taken down?
Gonna get started on this today. So excited! Thanks for sharing it!
thanks for the tutorial.Success
Post a Comment